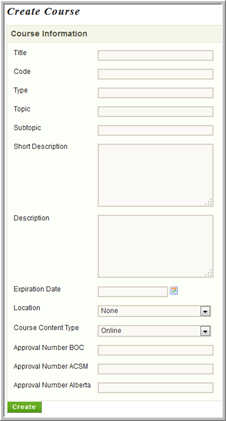
To create an XML course or a course using the Trellis Authoring Tool (if applicable), select the Create Course option under Courses. Fill out the desired Course Information fields for the new course.
- Title – Enter the title of the course as you want it to appear in the system for all users to see.
- Code – Enter a course code, if you would like to assign a specific one to this course. Otherwise, this field can be left blank.
- Type – Enter a course type, if you would like to distinguish the course type (e.g. Online, Self-Study, Test, etc.). Otherwise, this field can be left blank.
- Topic – Enter a topic/volume, if there is one. If not, leave this field blank.
- Short Description – Enter a short description that will appear in the user transcript page My Courses in the Learning Center.
- Description – Enter a description that will appear in the course information page for this course on the Learning Center. Note that HTML tags must be used for any type of formatting (e.g. <p>paragraphs</p>, <ul>bulleted list</ul>, <li>bullet points in bulleted list</li>, etc.).
- Expiration Date – If you know the date in which you would like to expire this course and have it no longer accessible by users (though the course and certificate will still appear in their transcripts), enter it here. You can always go back and add this later. If there is no expiration date listed, then the course will never expire.
- Location – For live classroom courses, select a location (that has been previously created) for the course from the drop-down menu only if there is only one training location and no additional course sections* for this course. Leave the location as “None” if course sections at multiple locations will be added later.
*If there will be multiple training locations and course sections, you will need to create each location separately before later creating and adding course sections.
- Course Content Type – By default, “Online” is selected, though “Live” classroom course is an option.
- Approval Numbers – Approval numbers for BOC, ACSM, and Alberta can be entered here so that they will dynamically appear on the corresponding certificate for each course. Note that course credits may be entered later by clicking on the Edit Information link on the Course Information page once this course has been created).
- Once you have created the course, you will be taken to the Course Information page where you can edit the information and add prerequisites.
- On the Course Information page, you may use the “Course Development” section on the right to add the course content using the Trellis Authoring Tool.